How to Make a Blanket from a Stitch Pattern
One of the most frequently asked questions I receive is, “How do I make a blanket from a stitch pattern?” Along with: “How much yarn do I need?” “What hook size should I use?” “How many chains should I make?”
I wish the answer was as simple as use this much yarn, use this hook, and chain this many chains. But of course, it never is! However, I will break down the steps to figuring out this information in the tutorial video and written information below.
While this tutorial is going to cover crochet examples, the same overall techniques apply to knitting as well.
Step 1. Find a Stitch Pattern
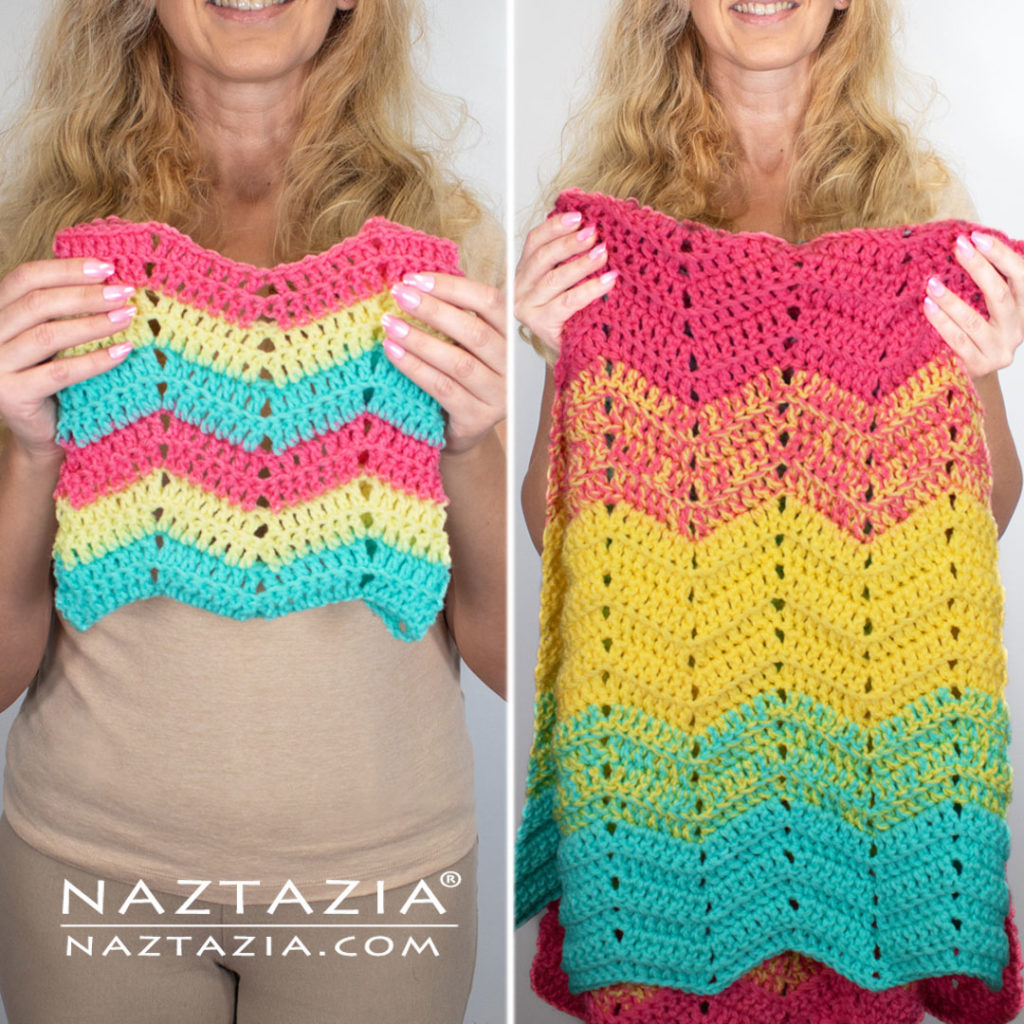
The first thing you need to do is decide on a stitch pattern for your blanket. Are you looking for something for a woman, or a man, or a child, or a pet, or a baby? It has been my experience that, for example, with pets, you don’t want a stitch pattern that has too many spaces or holes in it. Their paws and claws and teeth could get stuck. Maybe try this Wave Stitch with them.
Along the same lines, some people don’t really like baby blankets to have too many spaces or holes in it as well. Some new parents are nervous with their babies getting fingers or toes stuck in the holes. In this case, you might want to consider a more closed stitch like the Crunch Stitch.
On the other hand, sometimes you want a fancy baby blanket for a special occasion such as a baptism or a newborn photo session. Something like an open shell stitch such as the Basic Shell Stitch might work for that.
Another thing to consider is the person’s tastes. My husband doesn’t like anything too lacy or frilly. So that eliminates most of the shell stitches and lace patterns I have. However, post stitch patterns like the Alpine Stitch work fantastic with him.
Feel free to browse a list of my stitch patterns here on my website.
Step 2. Determine Blanket Size
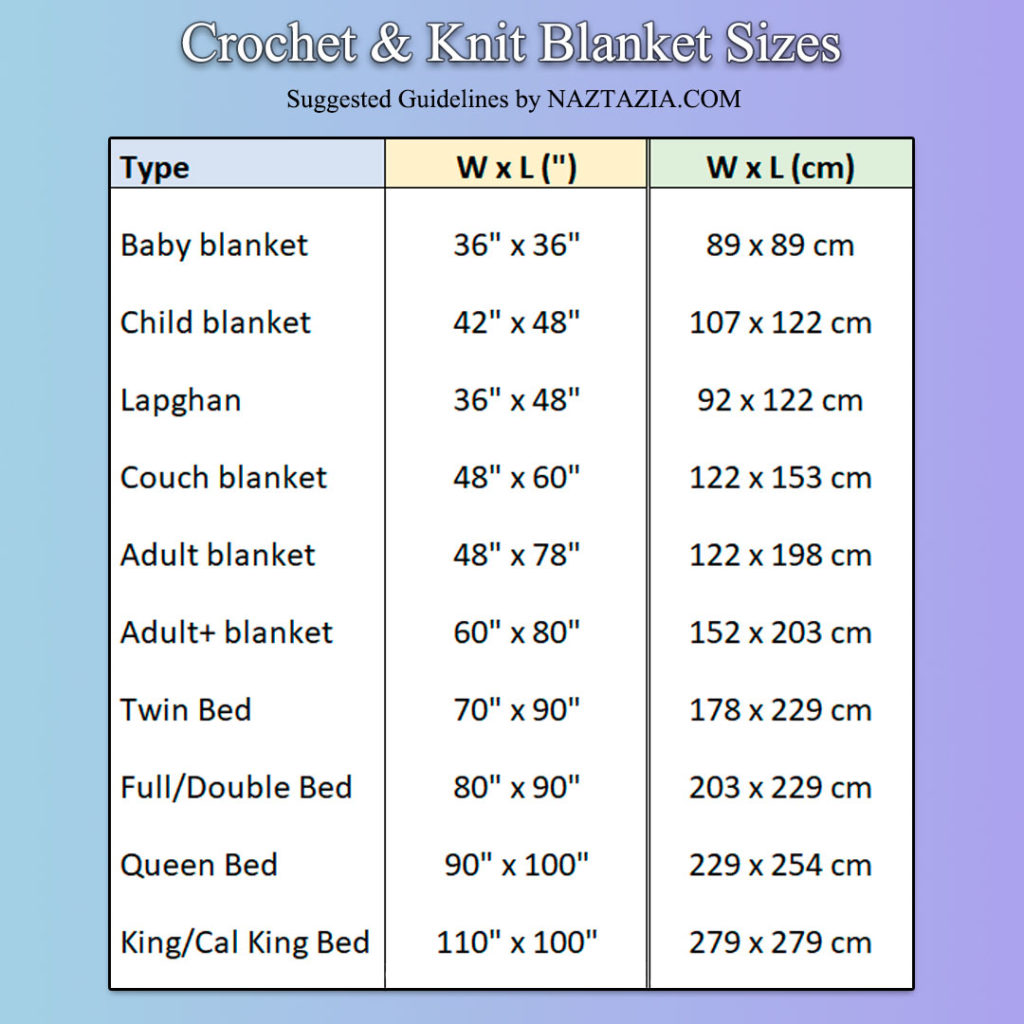
The second thing you need to do is figure out what size blanket you would like to make. Are you making a baby blanket? A blanket for a queen-sized bed? How about a really tall adult?
Below is a list of suggested blanket sizes, based upon my own experience. Certainly these sizes are only guidelines. You can make a twin-sized blanket a little longer or a little wider to accommodate the recipient’s preference. Also note the inches versus centimeters columns.
Another thing you can do is navigate over to this blankets link on Amazon.com (affiliate link) to see some of the sizes they offer. They will oftentimes have the size listed either right in the title or in the description of the product. While I’m suggesting to search for the word “blanket,” you might find other search terms useful like an afghan, throw, lapghan, lovey, cover, coverlet, comforter, bedspread, etc.
Step 3. Calculate Amount of Yarn
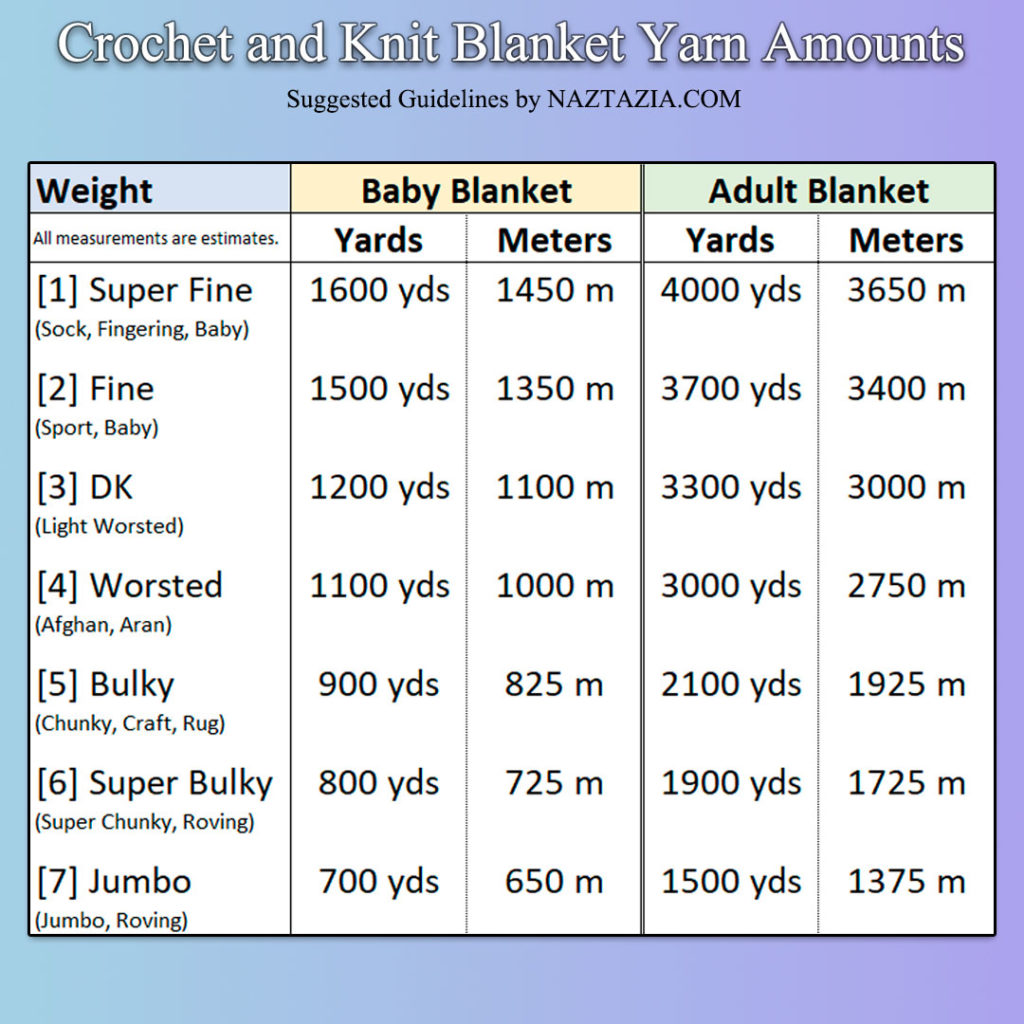
This is not an easy task. There are quite a lot of factors to take into consideration. As you can see from the chart below, the weight of yarn (thick or thinness) makes a huge difference in the amount of yards or meters you will need. Additionally, some stitches are “yarn eaters,” meaning they can take up to twice as much yarn in the same amount of space as other stitches.
On a side note, I’d highly recommend visiting my page and video on what stitches take up the most yarn. I provide a somewhat scientific experiment to back up my claims. You can find that information HERE.
The easiest thing to do is first figure out what type of yarn you plan on using. Do you plan on using a lighter weight [3] DK weight yarn? How about a bulky/chunky weight, which is a [5] on the label? Or are you sticking with the standard [4] medium/worsted weight yarn? Use the chart below to estimate how much yarn you will need.
Would you prefer a more scientific approach to calculating yarn amounts? I’d definitely suggest you read up and watch that video I recommended a few paragraphs ago. In that tutorial, I explain how you would make a swatch (stitch sample), then weigh and measure it. Plug in the numbers into my online yarn calculator on that page and you should get a more accurate amount of yarn needed. You can find that information HERE.
Step 4: Select a Hook
I’m always asked, “What type of hook should I use.” The answer to that question varies. The best answer I can tell you is look on the yarn label. Look for the “suggested hook size.” It should be there somewhere.
If a suggested hook size is not listed, then go with whatever hook size feels comfortable to you. Do the stitches look too messy? Is the hook splitting the yarn. Is the yarn falling off the hook? Are you having trouble going into the chains stitches with that hook? Might want to consider another size.
If you still can’t figure out what to use, I generally suggest starting with a size H 5 mm crochet hook.
Step 5: Calculate the Starting Chain with no Stitch or Chain Multiple
Here is the fun part – calculating how many chains you need to start a blanket. There are a couple of things to take into consideration first.
First, is there a stitch or chain multiple listed for the stitch? If so, you will need to take that number into consideration when calculating the starting chain. More on that in Step 6.
Second, do you have a measuring tape handy? You will need something to measure your starting chain with – either a measuring tape, or, a sample blanket with the same dimensions that you want to create.
Universal Stitch Multiple Calculator
Works for Knitting (Cast On) and Crochet (Starting Chain)
Here’s an Example
Let’s take an easy example first. Say I would like to do a 36″ x 36 ” baby blanket all in double crochet stitches. This has NO chain or stitch multiples (or I guess you can consider it has a multiple of 1 stitch).
First, chain about 36 inches worth of chains and count every one of them. Write that number down so you don’t forget it. I find that more often than not, the chain measurement (36″) needs to be a bit larger than the final product, since the subsequent row of stitches will shrink the size a bit. Other people might have the opposite effect, so do notate your own experience with this.
Second, skip the first 3 chains and double crochet in each of the chains across. Remember and/or count exactly how many stitches you made.
Third, measure your first row. Is it about 36 inches? Give or take of course, as no one will ever notice if it’s not precise. Especially the baby.
If your blanket is about 36 inches wide and you remember how many stitches you’ve made on the first row, just keep going! Chain 3, turn. Then keep making rows of the same number of double crochet until you reach the length of the blanket, which is 36 inches.
Pro Blanket Sizing Calculator
Fill in the details above to see the calculation.
Not Quite Right
If your blanket is not anywhere close to 36 inches, figure out what went wrong. Is it too big? Then your starting chain needs to be less. Is it too small? Then you need to make more stitches for your starting chain. You just need to rip our your work and keep playing with the starting chain until you get it right.
This is the life of a crochet designer - measuring, figuring, and ripping out.
Of course there are little tricks called foundation rows, which might make the starting row a bit easier to do. With these type of stitches, you crochet the chain and the first row stitch simultaneously. You can find that information here on my Naztazia website.
Step 6: Calculate the Starting Chain with a Stitch or Chain Multiple
A stitch or chain multiple means there is a special number of chains that need to be made in order to adhere to the pattern. For example, perhaps the stitch or chain multiple says, "chain a multiple of 3." You would multiple the number 3 by any number you wish to get the starting chain. For example, 3 times 1 is 3. 3 times 2 is 6, and 3 times 3 is 9, and 3 times 10 is 30, and 3 times 100 is 300. That means you can have a starting chain of (for example) 3, or 6, or 9, or 30, or 300.
Sometimes they throw a little trick in the mix and state, "chain a multiple of 5 + 2." What that means is you need to take the number of 5 and multiple it by any number you wish. Let's say 5 times 100 = 500 chains. But that plus 2 means after you've done your multiple, add 2 more. So our starting chain really needs to be 502.
Now, when you chain 36 inches worth of chains, you'll have to factor in this multiple of 5, plus add 2 more in your number. If 36 inches worth of chains comes out to 100 chains, you'll have to go with 102 instead to make the multiple work with that stitch pattern.
One More Thing
Now one more thing to consider (as if your mind isn't full enough). Some books will refer to a chain multiple, some a stitch multiple, some just a multiple. You have to put your mind-reading cap on sometimes. In all of my Naztazia stitch patterns, the multiple number refers to how to calculate the starting chain. However, in some books they don't count, for example, the initial chain 3 that you would make in a double crochet row as part of the "multiple." You are supposed to automatically "know" that information and factor it in afterwards. It's truly a stitch multiple, not a chain multiple. If you are off by 1 or 2 chains, despite following the pattern precisely, this might be the reason why.
Other than this fancy multiplying, everything else in Step 5 still applies. Measuring, calculating, remembering, ripping out, etc.
Step 7: Calculate the Starting Chain without KNOWING the Stitch or Chain Multiple
This is not as bad as it sounds. What I usually do when I don't know the stitch or chain multiple is chain 2-3 inches more of chains than what I need for the width. For example, in a 36" baby blanket I'll chain 39 inches worth.
Then I proceed to do the complete stitch pattern until about 36 inches. I verify that the stitch pattern has completed its repetition. In other words, I'm ending on a completed shell stitch or something like that. Then I take my scissors and cut off the excess chains, leaving 4 or 5 chains closest to the stitches.
Next, I'll unravel those 4 or 5 remaining chains. Once I get to the last stitch, I pull tightly to form a (new) beginning slipknot. And that's it! No one will ever know you didn't know the correct starting chain amount!
Step 8: Begin to Crochet the Blanket
Once your first row is solid, the rest should be pretty easy. You will keep crocheting rows until you reach your desired length. For example, if you were making a baby blanket, all the stitches on each row would measure 36 inches across. Then you would make so many rows to reach 36 inches in length.
The most important thing to do is write everything down! Write down the starting chain, write down the stitches used on the first row. Then write down the number of rows you made. Write down the final measurements of the blanket. And write down how many yards, meters, or skeins of yarn you used. You will need it for the future. Because you just know once someone sees the adorable baby blanket you made, they are going to want one too!
I highly recommend checking out the tutorial video as well, since I show some additional tips and tricks in it. I hope you enjoyed this information, and I can't wait to see photos of what you made! Donna Wolfe from Naztazia