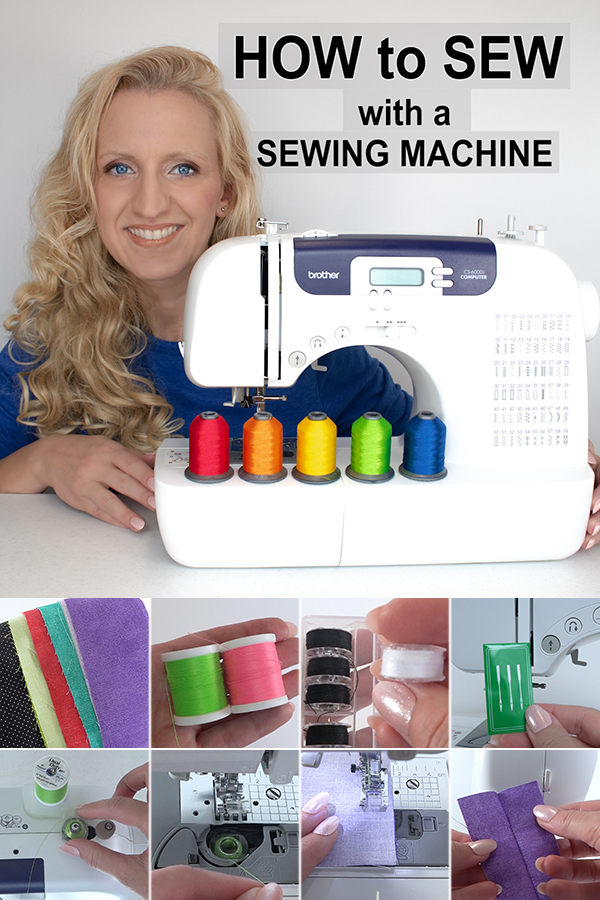
How to Use a Sewing Machine and Learn to Sew for Beginners
Want to learn how to use a sewing machine for beginners? I’ll show you the basics of how to sew using a sewing machine in this step-by-step video tutorial.
In this video I’ll show you the two types of sewing machines that I have. The first is a Brother computerized one. It is a relatively newer machine from 2015. My Singer machine is from 1995. You’ll find both types of machines are not all that different.
Why Use a Sewing Machine
You can hand sew anything. People have been making clothes with a needle and thread for thousands of years. And some people still prefer hand sewing an item over machine sewing.
However, if you need to connect two pieces of fabric quickly, a sewing machine is best suited for that job. And in my case, my hand sewn stitches are not always of a consistent length. My sewing machine does a much better job creating nicer straight stitches than I can ever do.
Types of Sewing Machines
When you think of a sewing machine, you probably think of a machine that holds a spool of thread. And that machine is used to make stitches on fabric. This is very much true. The traditional sewing machine is what this post and video is all about.
It’s probably worth noting there are other types of machines that sew too. An embroidery machine is especially designed to embroider on fabric. A serger (what we Americans call it) or overlock machine (what the rest of the world calls it) cuts and hems fabric. And a coverstitch machine has similar functions to a serger, but generally produces a nicer finished hem.
Just in case your machine doesn’t quite look like mine, perhaps you have a serger, overlock, or coverstitch machine instead!
How to Use Your Machine
In the video, you will find the following overall steps to using a sewing machine. It is important to read your own sewing machine’s manual, as some of these steps might be slightly different.
Basic Sewing Set Up
- Place the machine on a sturdy table. Use a chair that feels comfortable and is the right height for the table.
- Find the user manual for your sewing machine. This is very important! If you do not have a manual, perform a Google search for a PDF of your sewing machine’s manual. For example, type in: sewing machine brother cs6000i manual
- Plug the machine in. This might require plugging the power cord into a power outlet as well as plugging the foot pedal into the machine. I would suggest plugging the machine into a surge protector in case of a electricity issue.
- Determine if you have a bobbin in the machine or if you need to wind a new bobbin.
- If you need to wind a new bobbin with thread, use the diagrams on top of your machine for winding.
- Once completed, place the bobbin in the bobbin holder and replace the cover.
- Once the bobbin is in place, thread the machine. Follow the diagrams on properly threading the machine.
- Thread the needle. You might be fortunate and have an automatic needle threader. If not, just wet the tip of the thread and place it into the eye of the sewing needle.
Begin to Sew
- Find out where the presser foot lever is at on your machine. Once you find it, raise it by lifting it up.
- Turn the hand wheel on the side of the machine to raise the needle upwards. You want the needle at the highest position it can go in the machine.
- Place the fabric underneath the presser foot. Line up the fabric with the 5/8 inch marking. Lower the presser foot by lowering its lever.
- Using the hand wheel, turn it towards you until the needle pierces the fabric and is in its lowest position.
- Move your hands to the side of the fabric. Lightly press on the foot pedal. The foot pedal will regulate the speed at which the machine stitches.
- Use your hands only to gently (and I mean gently!) guide the fabric so it stays along the 5/8 inch mark.
- Once you get near the edge of the fabric, slow down the machine by letting up on the foot pedal. Yes, it is just like driving a car!
- Make 1 stitch past the edge of the fabric. Stop the machine.
- Turn the hand wheel until the needle is at its highest position.
- Raise the presser foot by raising its lever upwards.
- Carefully pinch the threads and fabric on the last stitch and pull it away from the machine.
- Cut the threads. And that’s it! You have successfully sewn something using your sewing machine.
So Many Ways to Sew!
The above is how I learned to sew. Now, someone might say, well you should raise the presser foot first before raising the needle. Or vice versa. Remember, there is no one “right way” to sew. We all do things a little bit differently. But as long as our machine stays in good shape after we have finished sewing, we must be doing something right!
I highly recommend that you watch my video, where I review everything from above. I also give some tips and tricks on an important stitch called the backstitch. A backstitch is a special stitch that you might want to use at the beginning and ending of every sewn stitch line. It helps lock the stitches in place more securely.
Be sure to pin the following image to your Pinterest board! Then continue reading below.
Here’s a nice image (or two) to pin on your Pinterest boards.
Please note I may receive compensation from the links below.
[embedyt] https://www.youtube.com/embed?listType=playlist&list=PL-Wznh_zZEy9VhQf21UF8UMnvqyhKHPUf&v=iQ6a56EwuYw[/embedyt]Nail polish used in this video includes L.A. Girl in GNL660 Illusion with LA Colors in CNP757 Pink Sugar.